Servoterm #
Servoterm (servo terminal) provides an interface which allows editing of the drive HAL configuration. It also provides a rolling graphical representation of any chosen parameter in the HAL, which can be a great aid to tuning and motor setup.
Servoterm is now available as a C++ application. You can download it from this GitHub repository.
Installation #
To install Servoterm, follow these steps:
Clone the repository:
git clone https://github.com/STMBL/QtServoterm.gitNavigate to the project directory:
cd QtServotermBuild the application using qmake and make (you need to install first the required dependencies based on your system):
qmake
make
Run the application:
./Servoterm
Connecting to STMBL #
To connect to the STMBL, you will need a USB C cable.
Be sure that the 24V PSU is floating or shares a ground reference with the PC.
(Maybe even check the voltage between the connector and socket before inserting the plug.)
You can then click the “connect” button and you should get something like the image below.
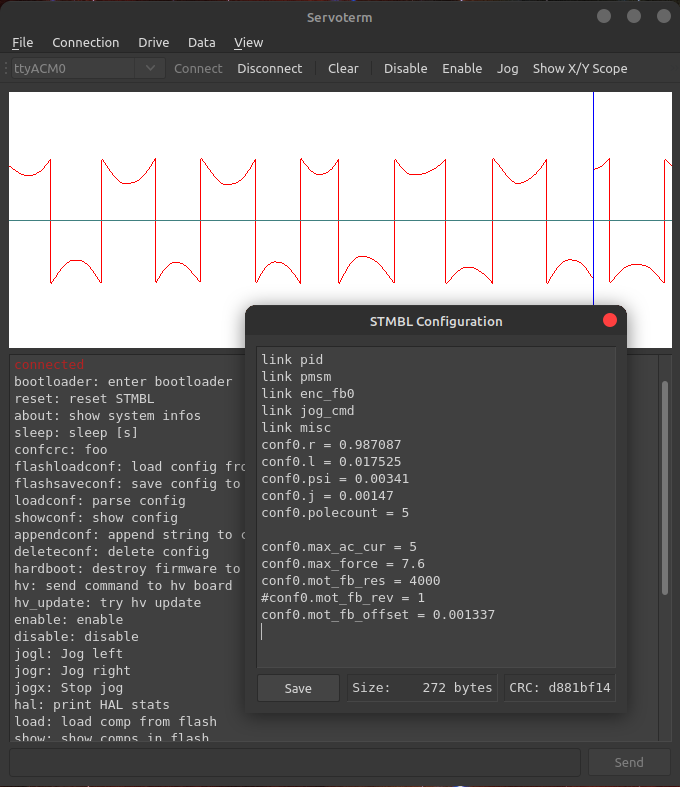
Servoterm Interface #
Taking the buttons from left to right:
- Connect / Disconnect (Connection) - Should be fairly self-evident
- Clear - simply clears the screen
- Disable / Enable (Drive) - Reenables the drive and clears faults. Does not reset the STMBL. To do that type the
Servoterm Commands,
reset - Record (Data) - Under Data menu, it allows the output of the graphs to be saved and exported as CSV.
- Jog (Drive) - when ticked the left-right arrow keys on the keyboard can be used to jog the motor.
- Show X/Y Scope (View) - This shows or hides the XY scope in the graph side.
- Config (Drive) - Brings up a sub-window in which the basic system config can be edited.
Other than the buttons described above, the remainder of Servoterm (and the STMBL HAL) is controlled by a command-line interface at the bottom. Servoterm uses the up and down arrow keys to scroll through previous commands, but there is no tab-completion. This is mainly described in the
HAL section. The graphing display is controlled by the “term0” interface. Typing term0 at the prompt will show output similar to:
term0.rt_prio = 16.000000
term0.frt_prio = 0.000000
term0.wave0 <= reslimit0.pos_out = 0.000000
term0.wave1 <= fb_switch0.plot_fb_pos = -0.000785
term0.wave2 <= vel0.vel = 0.000000
term0.wave3 <= vel1.vel = 0.000000
term0.wave4 = 0.000000
term0.wave5 = 0.000000
term0.wave6 = 0.000000
term0.wave7 = 0.000000
term0.offset0 = 0.000000
term0.offset1 = 0.000000
term0.offset2 = 0.000000
term0.offset3 = 0.000000
term0.offset4 = 0.000000
term0.offset5 = 0.000000
term0.offset6 = 0.000000
term0.offset7 = 0.000000
term0.gain0 = 20.000000
term0.gain1 = 20.000000
term0.gain2 = 1.000000
term0.gain3 = 1.000000
term0.gain4 = 10.000000
term0.gain5 = 10.000000
term0.gain6 = 10.000000
term0.gain7 = 10.000000
term0.send_step = 50.000000
term0.con = 1.000000
The first two entries are internal information about the HAL component and can be ignored for now. The next 8 lines say what internal signal each of the wave plots is connected to. In this case, wave0 (the black one) is connected to a sim signal, in this case, the sine wave. (as you might have guessed, typing “sim0” will show you the parameters of the simulated signals.) To connect wave1 (red) to the sawtooth output (which simulates both encoder feedback and a position command for steady rotation), then simply type term0.wave1 = sim0.vel. Each wave has an associated offset and gain parameter that can be used to adjust vertical scale and position. The term0.send_step parameter functions like the time-base of an oscilloscope.
Servoterm Commands #
The Servoterm command list can be obtained at the command line by using the help command. Commands to be used by the user:
bootloader: enter bootloaderreset: reset STMBLabout: show system infoshelp: print thislink: load config templatehal: print HAL statshv_update: update the F3 firmwareshow_config: show config templatesshow: show comps in flashlist: show comp instanceshv FOOBAR XYZ: send “FOOBAR XYZ” to the HV board
Commands for internal use:
confcrc: Shows the CRC checksum of the loaded config.flashloadconf: load config from flashflashsaveconf: save config to flashloadconf: parse configshowconf: show config - pressing theConfigbutton is better.appendconf: append string to config - also redundant with the config editordeleteconf: delete configload: load comp from flashstart: start rt systemstop: stop rt systemfault: trigger fault
Servoterm Connection Problems #
If you encounter connection issues, ensure that your serial setup is correct. Here are some steps to troubleshoot:
- Check Serial Port: Ensure that the correct serial port is selected in Servoterm.
- Ground Reference: Make sure that the 24V PSU is floating or shares a ground reference with the PC.
- USB Cable: Use a good quality USB C cable to connect the STMBL to your computer.
Linux/Mac? Add your username to the dialout group to be able to access the com ports. If you have used the Arduino IDE before, this is probably already set:
sudo usermod -a -G dialout username
Linux udev rules:
SUBSYSTEM=="usb", ACTION!="add", GOTO="objdev_rules_end"
#stmbl
ATTR{idVendor}=="0483", ATTR{idProduct}=="5740", ENV{ID_MM_DEVICE_IGNORE}="1", GROUP="users", MODE="0666"
#ST USB bootloader
ATTR{idVendor}=="0483", ATTR{idProduct}=="df11", GROUP="users", MODE="0666"
LABEL="objdev_rules_end"
If you get AT commands showing up in servoterm some application is sending commands to the virtual serial port despite the ENV{ID_MM_DEVICE_IGNORE}="1" above. For example on xfce with debian 10, ModemManager may need to be stopped with systemctl disable ModemManager.service or removed with sudo apt-get purge modemmanager